A workload is an application running on Kubernetes. Whether your workload is a single component or several that work together, on Kubernetes you run it inside a set of pods. In Kubernetes, a Pod represents a set of running containers on your cluster.
Kubernetes pods have a defined lifecycle. For example, once a pod is running in your cluster then a critical fault on the node where that pod is running means that all the pods on that node fail. Kubernetes treats that level of failure as final: you would need to create a new Pod to recover, even if the node later becomes healthy.
However, to make life considerably easier, you don't need to manage each Pod directly. Instead, you can use workload resources that manage a set of pods on your behalf. These resources configure controllers that make sure the right number of the right kind of pod are running, to match the state you specified.
Deployments
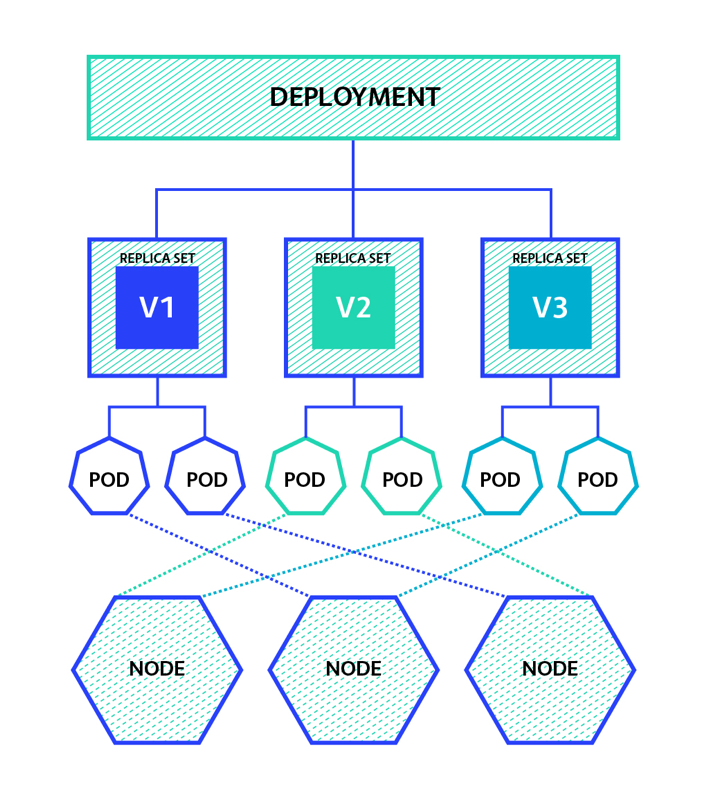
In Kubernetes, a Deployment is a higher-level object that manages a set of replica sets and pods. Deployments are used to ensure that a specified number of identical pods are running at any given time, and they can help manage rolling updates, scaling, and rollbacks.

Here's an example Deployment manifest that deploys a simple nginx web server:
apiVersion: apps/v1
kind: Deployment
metadata:
  name: nginx-deployment
spec:
  replicas: 3
  selector:
    matchLabels:
      app: nginx
  template:
    metadata:
      labels:
        app: nginx
    spec:
      containers:
      - name: nginx
        image: nginx:latest
        ports:
        - containerPort: 80
This manifest specifies a Deployment called "nginx-deployment" that will create and manage three replicas of an nginx container. The selector field tells the Deployment to manage all replicas that have the label "app=nginx". The template field specifies the Pod template that will be used to create each replica, and the container field specifies the container specification.
To create this Deployment in your Kubernetes cluster, save the manifest to a file (e.g. nginx-deployment.yaml) and run the following command:
kubectl apply -f nginx-deployment.yaml
This will create the Deployment and its associated replica sets and pods. You can then use kubectl commands to manage the Deployment, such as scaling it up or down:
# Scale the Deployment to 5 replicas
kubectl scale deployment nginx-deployment --replicas=5

# Get the status of the Deployment
kubectl get deployment nginx-deployment

# Roll back to the previous Deployment revision
kubectl rollout undo deployment nginx-deployment
StatefulSets
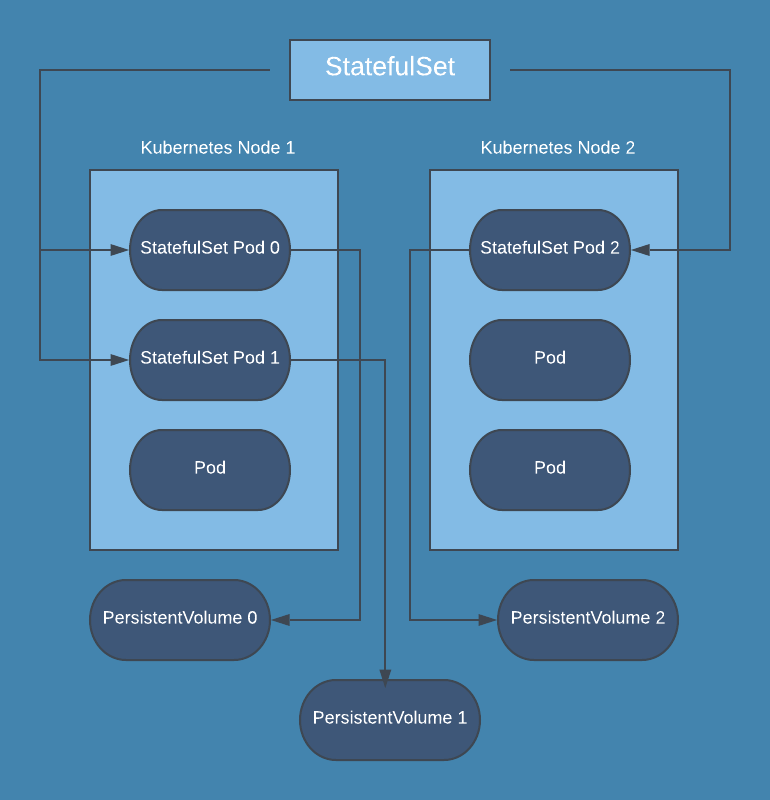
Certainly! StatefulSets are another type of Kubernetes workload that are used to manage stateful applications that require stable network identifiers and persistent storage.
StatefulSets are similar to Deployments, but they differ in how they manage pods. StatefulSets ensure that each pod in the set has a stable and unique network identity, which is important for stateful applications that need to maintain a consistent identity or hostname. StatefulSets also provide ordered deployment and scaling, and they support stateful updates and rollbacks.

Here's an example StatefulSet manifest that deploys a simple Redis server:
apiVersion: apps/v1
kind: StatefulSet
metadata:
  name: redis
spec:
  replicas: 3
  selector:
    matchLabels:
      app: redis
  serviceName: redis
  template:
    metadata:
      labels:
        app: redis
    spec:
      containers:
      - name: redis
        image: redis:latest
        ports:
        - containerPort: 6379
        volumeMounts:
        - name: data
          mountPath: /data
  volumeClaimTemplates:
  - metadata:
      name: data
    spec:
      accessModes: [ "ReadWriteOnce" ]
      resources:
        requests:
          storage: 1Gi
This manifest specifies a StatefulSet called "redis" that will create and manage three replicas of a Redis container. The selector field tells the StatefulSet to manage all replicas that have the label "app=redis". The serviceName field specifies the name of the Kubernetes Service that will be used to access the Redis pods.
The template field specifies the Pod template that will be used to create each replica, and the container field specifies the container specification. In this case, the Redis container mounts a persistent volume at /data to store its data.
To create this StatefulSet in your Kubernetes cluster, save the manifest to a file (e.g. redis-statefulset.yaml) and run the following command:
kubectl apply -f redis-statefulset.yaml
This will create the StatefulSet and its associated pods and volumes. You can then use kubectl commands to manage the StatefulSet, such as scaling it up or down:
# Scale the StatefulSet to 5 replicas
kubectl scale statefulset redis --replicas=5

# Get the status of the StatefulSet and its pods
kubectl get statefulset redis
kubectl get pods -l app=redis

# Delete the StatefulSet and its associated pods and volumes
kubectl delete statefulset redis
kubectl delete pvc -l app=redis
DaemonSets
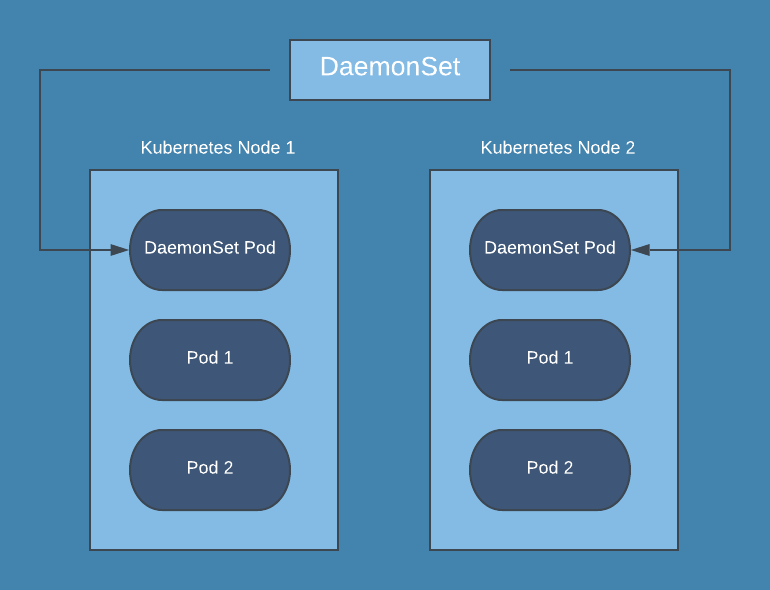
A DaemonSet is a type of Kubernetes workload that ensures that a copy of a pod is running on every node in a cluster. This is useful for tasks such as running monitoring agents, log collectors, or network proxies that need to be present on every node.

Here's an example DaemonSet manifest that deploys a simple Fluentd logging agent:
apiVersion: apps/v1
kind: DaemonSet
metadata:
  name: fluentd
spec:
  selector:
    matchLabels:
      app: fluentd
  template:
    metadata:
      labels:
        app: fluentd
    spec:
      containers:
      - name: fluentd
        image: fluent/fluentd:latest
        volumeMounts:
        - name: varlog
          mountPath: /var/log
      volumes:
      - name: varlog
        hostPath:
          path: /var/log
This manifest specifies a DaemonSet called "fluentd" that will create and manage a pod running the Fluentd logging agent on every node in the cluster. The selector field tells the DaemonSet to manage all pods that have the label "app=fluentd".
The template field specifies the Pod template that will be used to create each pod, and the container field specifies the container specification. In this case, the Fluentd container mounts the host's /var/log directory to its own /var/log directory to collect logs.
To create this DaemonSet in your Kubernetes cluster, save the manifest to a file (e.g. fluentd-daemonset.yaml) and run the following command:
kubectl apply -f fluentd-daemonset.yaml
This will create the DaemonSet and its associated pods on every node in the cluster. You can then use kubectl commands to manage the DaemonSet, such as checking the status of the pods:
# Get the status of the DaemonSet and its pods
kubectl get daemonset fluentd
kubectl get pods -l app=fluentd
Jobs
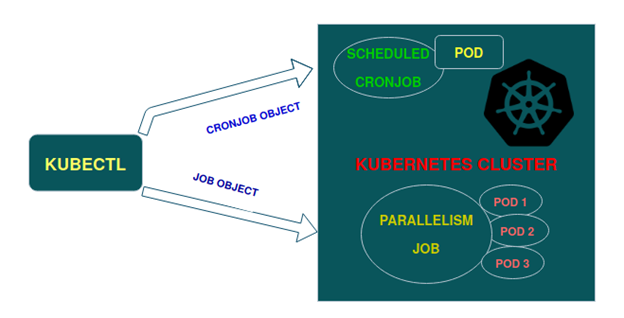
Jobs are a type of Kubernetes workload that create one or more pods to perform a specific task and then exit once the task is completed. Jobs are useful for running batch processing tasks, running periodic backups, or running one-time administrative tasks.

Here's an example Job manifest that runs a simple batch processing task:
apiVersion: batch/v1
kind: Job
metadata:
  name: batch-job
spec:
  template:
    spec:
      containers:
      - name: batch-job
        image: image:latest
        command: ["sh", "-c", "echo 'Hello, world!' && sleep 5"]
      restartPolicy: Never
  backoffLimit: 2
This manifest specifies a Job called "batch-job" that will create and manage a single pod running the busybox image. The pod will run a shell command to echo "Hello, world!" and then sleep for 5 seconds before exiting.
The restartPolicy field is set to Never, which means that the pod will not be restarted if it fails or terminates. The backoffLimit field is set to 2, which means that if the pod fails, Kubernetes will retry the job up to 2 times before giving up.
To create this Job in your Kubernetes cluster, save the manifest to a file (e.g. batch-job.yaml) and run the following command:
kubectl apply -f batch-job.yaml
This will create the Job and its associated pod in your cluster. You can then use kubectl commands to manage the Job, such as checking the status of the pod:
# Get the status of the Job and its pod
kubectl get job batch-job
kubectl logs -f job/batch-job
The logs command will follow the logs of the pod and show the output of the echo command.
CronJobs
CronJobs are a type of Kubernetes workload that create and manage Jobs on a scheduled basis. They are useful for running periodic or scheduled tasks, such as backups, data processing, or other maintenance tasks.
.png?lang=en-US&ext=.png)
Here's an example CronJob manifest that runs a Job every 5 minutes to perform a backup task:
apiVersion: batch/v1beta1
kind: CronJob
metadata:
  name: backup-cronjob
spec:
  schedule: "*/5 * * * *"
  jobTemplate:
    spec:
      template:
        spec:
          containers:
          - name: backup-container
            image: image:latest
            command: ["/bin/sh", "-c", "echo 'Performing backup'"]
          restartPolicy: OnFailure
This manifest specifies a CronJob called "backup-cronjob" that runs a Job every 5 minutes to perform a backup task. The schedule field uses a standard cron syntax to specify the timing of the Job, in this case, "*/5 " meaning "every 5 minutes".
The jobTemplate field specifies the Job template that will be used to create each Job, with the container field specifying the container specification. In this case, the container runs a simple shell command to echo "Performing backup".
The restartPolicy field is set to OnFailure, which means that the Job will be restarted if it fails.
To create this CronJob in your Kubernetes cluster, save the manifest to a file (e.g. backup-cronjob.yaml) and run the following command:
kubectl apply -f backup-cronjob.yaml
This will create the CronJob and its associated Job templates in your cluster. You can then use kubectl commands to manage the CronJob and check its status:
# Get the status of the CronJob and its Jobs
kubectl get cronjob backup-cronjob
kubectl get jobs --selector=job-name=backup-cronjob
This will show the status of the CronJob and any Jobs that have been created by it.
