


Table of contents
- 🔹What Is Virtualization
- 🔹What is Linux?
- 🔹What Is Linux File System
- 🔹Linux Basic Commands
- 🔹 How to use editor in Linux
- 🔹Grep Command
- 🔹Find Command
- 🔹How to Use Pipe in Linux
- 🔹Linux Wildcards
- 🔹What is Tar, Gzip, and Gunzip?
- 🔹Linux Hard & Soft Links
- 🔹Linux Environment Variables
- 🔹Linux Redirects
- 🔹PS command
- 🔹Linux Kill Command
- 🔹Top Command
- 🔹Linux with nohup, nice, bg, fg, and jobs Commands
🔹What Is Virtualization
Virtualization is a technology that allows you to run multiple operating systems and applications on a single physical server or host machine. It achieves this by creating virtual machines (VMs), which are software-based representations of physical computers.
Here's how virtualization works and why it's important:
Hypervisor: Virtualization is made possible by a software layer called a hypervisor. The hypervisor runs directly on the physical hardware and manages the virtual machines. There are two types of hypervisors: Type 1 (bare-metal) and Type 2 (hosted).
Virtual Machines: Each virtual machine is an isolated and self-contained environment that includes its own operating system, applications, and resources. Multiple VMs can coexist on the same physical server, sharing its CPU, memory, storage, and network resources.
Resource Allocation: The hypervisor controls the allocation of physical resources to each VM. It ensures that VMs do not interfere with each other and that they receive the necessary resources to operate efficiently.
Isolation: VMs are isolated from each other, meaning that if one VM crashes or experiences issues, it does not affect the others. This isolation enhances security and stability.
Hardware Independence: Virtualization abstracts the underlying hardware, allowing VMs to run on different physical servers without modification. This flexibility makes it easier to migrate VMs between hosts.
Snapshot and Cloning: Virtualization enables the creation of snapshots, which are point-in-time copies of a VM's state. This feature is valuable for backup and recovery. Cloning allows you to duplicate VMs quickly.
Resource Efficiency: By consolidating multiple VMs on a single physical server, virtualization maximizes resource utilization and reduces hardware costs. It's a key component of data center optimization and cloud computing.
Testing and Development: Virtualization is commonly used for software development and testing. Developers can create VMs to mimic various environments without needing dedicated hardware.
High Availability: Virtualization can enhance the availability of applications. If one physical server fails, VMs can be automatically migrated to other hosts, minimizing downtime.
Migration and Scaling: VMs can be easily moved or duplicated to scale applications up or down as needed. This flexibility supports dynamic workloads and business continuity.
🔹What is Linux?
Linux is an open-source operating system kernel that serves as the core of various Linux distributions (commonly referred to as Linux OS). It was created by Linus Torvalds in 1991 and is known for its stability, security, and flexibility. Linux is widely used in server environments, embedded systems, and as an alternative to other operating system s like Windows and macOS.
Why Linux:
Linux is open-source, meaning it's freely available and highly customizable.
It's known for stability, security, and performance.
Linux offers a wide range of software and tools for various purposes.
Where Linux Is Used:
Linux powers servers and web hosting environments globally.
It's used in embedded systems (e.g., IoT devices).
Linux is the core of Android OS.
Many supercomputers run on Linux.
Why Learn Linux:
Linux skills are in high demand, particularly in IT and DevOps.
It's essential for server administration and cloud computing.
Learning Linux enhances your command-line and problem-solving abilities.
It's a valuable skill for software development and cybersecurity.
Linux Distributions (Distros):
Linux comes in various distributions (distros).
Popular distros include Ubuntu (user-friendly), CentOS (for servers), and Debian (stable).
Choose a distro based on your needs and preferences.
🔹What Is Linux File System
The Linux file system, often referred to as the "Linux directory structure" or "Linux file hierarchy," is the organizational structure used by the Linux operating system to store and manage files and directories. It follows a hierarchical tree-like structure that starts from the root directory ("/") and branches into various subdirectories.
Key components of the Linux file system include:
Root Directory (/): The top-level directory in the file system. Everything in Linux is stored under this directory. It is represented as "/".
Subdirectories: Linux organizes files and directories in a hierarchical manner under the root directory. Common subdirectories include:
/home: User home directories.
/etc: Configuration files.
/bin and /sbin: Essential system binaries and scripts.
/usr: User and system application files.
/var: Variable data, such as logs and caches.
/tmp: Temporary files.
/dev: Device files.
/mnt and /media: Mount points for external devices.
Files: Linux files can be regular files, directories, symbolic links, device files, and more. They are organized within directories.
Mount Points: Directories where external storage devices (e.g., USB drives) are attached and accessed.
Symbolic Links: Special files that point to other files or directories.
🔹Linux Basic Commands
Here is a list of commonly used Linux commands along with a brief explanation of their functionalities:
ls: Lists the files and directories in the current directory.cd: Changes the current directory.pwd: Prints the current working directory.mkdir: Creates a new directory.rm: Removes files and directories.cp: Copies files and directories.mv: Moves or renames files and directories.cat: Concatenates and displays the contents of files.grep: Searches for patterns in files.chmod: Changes the permissions of files and directories.chown: Changes the ownership of files and directories.sudo: Executes a command with administrative privileges.apt-getoryum: Package managers used to install, update, and manage software packages.wget: Downloads files from the internet.ssh: Connects to a remote server securely using the SSH protocol.tar: Archives and extracts files.top: Displays real-time information about system processes and resource usage.df: Shows the disk space usage of file systems.free: Displays the amount of free and used memory in the system.history: Lists the previously executed commands.man: Displays the manual pages for commands and provides information on their usage and options.find: Searches for files and directories based on various criteria, such as name, type, size, or permissions.grep: Searches for specific patterns or regular expressions within files.head: Displays the first few lines of a file.tail: Displays the last few lines of a file.sort: Sorts the contents of a file or input.uniq: Filters adjacent duplicate lines from input.wc: Counts the number of lines, words, and characters in a file or input.sed: Stream editor for modifying and transforming text.awk: Powerful text processing tool for manipulating structured data.ping: Sends network ICMP echo requests to a specific host to check connectivity.ifconfigorip: Displays network interface configuration and manages network settings.netstat: Shows network statistics, active connections, and listening ports.ssh-keygen: Generates SSH key pairs for secure authentication.tar: Archives files into a single file, often compressed.curl: Command-line tool for transferring data using various protocols (HTTP, FTP, etc.).du: Displays disk usage of files and directories.cron: Schedules recurring tasks or commands to run automatically at specified intervals.alias: Creates custom shortcuts or aliases for commands.echo: Prints text or variables to the terminal.
🔹 How to use editor in Linux
Using a text editor in Linux is essential for various tasks, such as writing scripts, editing configuration files, or taking notes. There are several text editors available in Linux, and two of the most commonly used ones are nano (a simple, beginner-friendly editor) and vim (a powerful, keyboard-driven editor). Here's how to use both:
Using nano:
Open a Terminal: Launch your terminal emulator. You can find it in your applications menu or use the keyboard shortcut
Ctrl+Alt+T.Open a File: To open a file with nano, simply type
nanofollowed by the filename and press Enter. For example:nano myfile.txtNavigate: Use the arrow keys to navigate through the text.
Editing: You can edit the text as you would in any other text editor. Use the Backspace/Delete key to remove text or type new text.
Save Changes:
To save the changes, press
Ctrl+O, which stands for "Write Out."Confirm the filename and press Enter to save.
Exit nano:
- To exit nano, press
Ctrl+X.
- To exit nano, press
Ctrl + O: Saves the current file.
Ctrl + X: Exits the Nano editor.
Ctrl + G: Opens the Nano help menu, displaying available commands.
Ctrl + K: Cuts the current line and stores it in the Nano clipboard.
Ctrl + U: Pastes the contents of the Nano clipboard.
Ctrl + W: Searches for a specific string within the file.
Using vim:
Open a Terminal: Launch your terminal emulator.
Open a File: To open a file with vim, type
vimfollowed by the filename and press Enter. For example:vim myfile.txtNavigate: Use the following keys to navigate:
Arrow keys or
h,j,k,lfor movement.ggto go to the start of the file.Gto go to the end of the file.:/searchtermto search for text (replacesearchtermwith your search query).
Editing:
Press
ito enter insert mode, where you can edit the text.Press
Escto exit insert mode and return to command mode.To delete a character, use
x.To save changes, type
:wand press Enter.To exit vim, type
:qand press Enter.
Save and Exit:
- To save changes and exit, type
:wqand press Enter.
- To save changes and exit, type
Exit without Saving:
- To exit without saving changes, type
:q!and press Enter.
- To exit without saving changes, type
🔹Grep Command
grep is a powerful command-line tool used in Unix-like operating systems (including Linux) to search for patterns within text files or input streams. It stands for "Global Regular Expression Print." It works by examining each line of text and printing any lines that match a specified pattern or regular expression.
Here's a basic overview of how grep is used and some differences between grep and egrep:
Basic Usage:
grep [options] pattern [file...]
pattern: This is the regular expression or text string you want to search for within the specified files or standard input.file: Optional. You can specify one or more files in which to search for the pattern. If not specified,grepwill read from standard input.
Differences Between grep and egrep (grep -E):
Basic vs. Extended Regular Expressions:
grepuses Basic Regular Expressions (BRE) by default, which have a more limited set of metacharacters.egrep, orgrep -E, uses Extended Regular Expressions (ERE), which support a broader range of metacharacters and allow for more complex patterns.
Metacharacters:
In
grep, you need to escape some metacharacters like+,?, and|to give them their special meaning, e.g.,\+,\?,\|.In
egrep, these metacharacters have their special meaning without escaping, making the patterns more concise.
Examples:
Here are some examples to illustrate the usage of grep:
Search for the word "apple" in a file named
fruits.txt:grep "apple" fruits.txtSearch for "banana" case-insensitively in all text files within a directory and its subdirectories:
grep -i -r "banana" /path/to/directoryList the names of files containing the word "linux" in a directory (without displaying the matching lines):
grep -l "linux" *Search for lines in a file with line numbers where "error" occurs:
grep -n "error" logfile.txt-c(or--count): Display the count of matching lines instead of the lines themselves.grep -c "pattern" file.txt-v(or--invert-match): Invert the match, displaying lines that do not contain the specified pattern.grep -v "pattern" file.txt-e(or--regexp): Allows specifying multiple patterns to search for.grep -e "apple" -e "banana" fruits.txtUse
egrepto search for lines containing either "apple" or "banana" in a file:egrep "apple|banana" fruits.txtUse
egrepto search for lines with email addresses in a file:egrep "\b[A-Za-z0-9._%+-]+@[A-Za-z0-9.-]+\.[A-Za-z]{2,4}\b" emails.txt
Remember that grep and egrep are powerful tools for pattern matching in text data, and mastering regular expressions can greatly enhance their utility.
🔹Find Command
The find command in Linux is a powerful utility that allows you to search for files and directories within a specified directory hierarchy based on various criteria. It is particularly useful for locating files that match specific patterns, attributes, or conditions. Here is an explanation of the find command along with some examples of commonly used parameters:
Basic Syntax:
find [starting_directory] [options] [expression]
[starting_directory]: Specifies the directory where the search begins. If not provided, it starts from the current directory.[options]: Additional options that modify the search behavior.[expression]: Specifies the search criteria.
Common find Parameters:
-name:Example:
find /path/to/search -name "file.txt"Searches for files and directories with the specified name.
-type:Example:
find /path/to/search -type fSearches for files (
f) or directories (d).
-mtime:Example:
find /path/to/search -mtime -7Searches for files modified within the last 7 days.
-size:Example:
find /path/to/search -size +10MSearches for files larger than 10 megabytes.
-exec:Example:
find /path/to/search -name "*.txt" -exec rm {} \;Executes a command on each matching file. The
{}is a placeholder for the file path, and\;terminates the-execcommand.
-print:Example:
find /path/to/search -name "*.jpg" -printPrints the matching file paths.
-maxdepth:Example:
find /path/to/search -maxdepth 2 -name "file.txt"Limits the search to a specified maximum directory depth.
-mindepth:Example:
find /path/to/search -mindepth 2 -name "file.txt"Sets a minimum directory depth for the search.
-iname:Example:
find /path/to/search -iname "file.txt"Performs a case-insensitive search for files and directories with the specified name.
-user:Example:
find /path/to/search -user usernameSearches for files owned by a specific user.
-links:Example:
find /path/to/search -links <no_of_links>Search a file based on the no of links.
-perm:Example:
find /path/to/search -perm /u=xExample:
find /path/to/search -perm 777Searches for files based on the permissions.
-empty:Example:
find /path/to/search -emptySearches all the empty files in a given directory.
🔹How to Use Pipe in Linux
In Linux, the pipe sign | is a powerful operator used to connect the output of one command to the input of another. It allows you to create a chain of commands where the output of the first command is passed as input to the next command. This is known as "piping" and is a fundamental concept in Unix-like operating systems for building complex operations by combining simple commands.
The basic syntax is as follows:
command1 | command2
Here's how to use the pipe operator with examples:
Basic Usage:
ls | grep "file"In this example, the
lscommand lists files and directories in the current directory, and the output is piped (|) to thegrepcommand, which searches for lines containing the word "file." This allows you to find files that match a specific pattern.Counting Lines:
cat textfile.txt | wc -lHere,
catdisplays the content of thetextfile.txt, and its output is piped towc -l, which counts the number of lines in the file.Filtering and Extracting Information:
ls -l | awk '{print $9}'This command lists the files in the current directory with detailed information using
ls -land then pipes the output toawk, which extracts and prints the file names from the list.
The pipe operator | enables you to create powerful and flexible command pipelines by combining the capabilities of multiple commands to perform complex operations efficiently.
🔹Linux Wildcards
Wildcards in Linux are special characters used in commands to match and represent one or more characters in filenames or directory names. They are handy for performing operations on multiple files or directories that match a specific pattern. Here are some common wildcards in Linux, along with examples:
Asterisk (
*):The asterisk
*represents zero or more characters.Example:
ls *.txtlists all files ending with ".txt" in the current directory.
Question Mark (
?):The question mark
?represents a single character.Example:
ls file?.txtlists files like "file1.txt," "file2.txt," but not "file12.txt."
Square Brackets (
[]):Square brackets
[]enclose a character class and match any single character listed within the brackets.Example:
ls [aeiou]*lists files that start with a vowel.
Caret (
^):The caret
^negates a character class, matching any character not listed within square brackets.Example:
ls [^0-9]*lists files that don't start with a digit.
Braces (
{}):Braces
{}define a group of patterns separated by commas, and they are used for generating multiple filenames.Example:
mv file{1,2,3}.txt destination/moves "file1.txt," "file2.txt," and "file3.txt" to the "destination" directory.
Double Asterisk (
**):The double asterisk
**is used for recursive searches in some shells and utilities.Example:
grep -r "pattern" **/*.txtsearches for "pattern" in all.txtfiles in subdirectories.
Tilde (
~):The tilde
~represents the home directory of the current user.Example:
cd ~/Documentschanges the directory to the "Documents" folder in your home directory.
🔹What is Tar, Gzip, and Gunzip?
Tar:
Description: Tar (short for "tape archive") is a command-line utility in Unix-like operating systems for creating and manipulating archive files. It is often used to combine multiple files and directories into a single archive file for easier storage or transfer.
Usage:
To create a tar archive of files and directories:
tar -cvf archive.tar file1.txt file2.txt dir1/This command creates a tar archive named
archive.tarcontainingfile1.txt,file2.txt, and the contents ofdir1/.To extract files from a tar archive:
tar -xvf archive.tarThis command extracts the files and directories from
archive.tar.
Gzip:
Description: Gzip is a compression program used to reduce the size of files and save disk space. It is often used in conjunction with the
tarcommand to compress and decompress tar archives.Usage:
To compress a file using gzip:
gzip file.txtThis command compresses
file.txtand creates a compressed file namedfile.txt.gz.To decompress a gzip-compressed file:
gzip -d file.txt.gzThis command decompresses
file.txt.gzand restores the original file asfile.txt.
Gunzip:
Description: Gunzip is a decompression program specifically used to decompress files that have been compressed with gzip. It is a companion utility to gzip.
Usage:
To decompress a gzip-compressed file using gunzip:
gunzip file.txt.gzThis command decompresses
file.txt.gzand restores the original file asfile.txt.
🔹Linux Hard & Soft Links
Hard Links:
When you create a hard link, it essentially creates multiple directory entries (filenames) that point to the same data blocks on disk.
If you delete one of the hard links, the data remains intact on disk, and other hard links still reference the data.
The data is only deleted when the last hard link to the file is removed, and there are no more references to the data.
Creation:
To create a hard link, you can use the
lncommand with the-hardoption:ln sourcefile hardlinkThis command creates a hard link named
hardlinkthat points tosourcefile.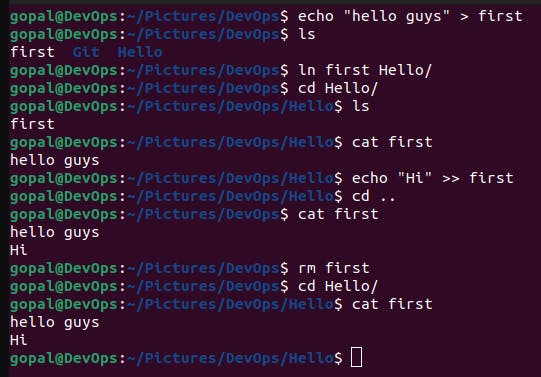
Symbolic (Soft) Links:
A symbolic link, on the other hand, is a separate file that contains a path or reference to another file or directory.
If you delete a symbolic link, it doesn't affect the target file or directory. The data in the target remains unaffected.
Symbolic links are more like pointers or references to other files or directories.
Creation:
To create a soft link, you can use the
lncommand with the-soption:ln -s sourcetarget symlinkThis command creates a symbolic link named
symlinkthat points tosourcetarget.
🔹Linux Environment Variables
Environment variables in Linux are dynamic values that can affect the behavior of processes and applications. They provide a way to store configuration settings, system information, or other data that various programs can access.
Setting Temporary Environment Variables:
You can set an environment variable in Linux using the
exportcommand followed by the variable name and its value. For example:export MY_VARIABLE="Hello, World!"This sets an environment variable named
MY_VARIABLEwith the value "Hello, World!"
Accessing Environment Variables:
To access the value of an environment variable, you can use the
$symbol followed by the variable name. For example:echo $MY_VARIABLEThis command would print "Hello, World!" to the terminal.
Unset Environment Variables:
To unset the value of an environment variable, you can use the unset command. For example:
unset MY_VARIABLE
Permanent Environment Variable:
Setting a Permanent Variable: To set a permanent environment variable that is available across sessions and for all users on the system, you typically add the variable definition to a configuration file like
~/.bashrc(for individual users) or a system-wide file like/etc/environment(for all users).For example, to set a permanent variable in
~/.bashrc:echo 'export PERM_VAR="This is a permanent variable"' >> ~/.bashrcThen, to apply the change immediately for your current session:
source ~/.bashrcOr, if you want to set a permanent variable system-wide in
/etc/environment, you would edit the file as the root user.Accessing a Permanent Variable: Once a permanent variable is set, it will be available across sessions and for all users. You can access it in the same way as a temporary variable:
echo $PERM_VARThis will print "This is a permanent variable" for any user and across sessions on the system.
global Environment Variable: you can use the /etc/profile file to set global environment variables in Linux. /etc/profile is a system-wide configuration file that is executed during the login process for all users. Any environment variables set in this file will be available to all users when they log in or start a new session.
Here's how to set a global environment variable in /etc/profile:
Open
/etc/profilewith a text editor as the root user. For example:sudo nano /etc/profileAdd the variable definition using the
exportcommand. For example:export MY_GLOBAL_VAR="This is a global variable"Save the file and exit the text editor.
The variable
MY_GLOBAL_VARwill now be available to all users on the system after they log in or start a new session.
🔹Linux Redirects
In Linux, redirects are used to control the input and output of commands and scripts. They allow you to send the output of a command to a file, read input from a file, or pipe the output of one command as input to another. Redirects are commonly used for data manipulation, scripting, and automation tasks. Here are some common redirect operators and their usage:
Redirecting Standard Output (
>):The
>operator is used to redirect the standard output (stdout) of a command to a file. If the file already exists, it will be overwritten. If it doesn't exist, a new file will be created.Example:
echo "Hello, world!" > output.txtAppending to a File (
>>):The
>>operator is used to append the standard output of a command to a file. If the file doesn't exist, it will be created.Example:
echo "Additional text" >> output.txtRedirecting Standard Error (
2>):The
2>operator is used to redirect the standard error (stderr) of a command to a file.Example:
command_that_generates_an_error 2> error.logRedirecting Standard Output and Standard Error (
&>or2>&1):The
&>operator or2>&1is used to redirect both the standard output and standard error to a file.Example:
command_that_generates_output_and_error &> output_and_error.logRedirecting Input (
<):The
<operator is used to read input from a file and provide it as input to a command.Example:
command_that_reads_input < input.txtPiping Output (
|):The
|operator is used to send the output of one command as input to another command. It allows you to chain commands together.Example:
command1 | command2Null Device (
/dev/null):/dev/nullis a special file in Linux that represents a null device. Redirecting output to/dev/nulleffectively discards the output.Example (to suppress output):
command_with_noisy_output > /dev/null
🔹PS command
The ps command in Linux is used to view information about running processes on a system. It provides detailed information about the processes running on your system, including their process IDs (PIDs), resource utilization, and other attributes. Here's how to use the ps command:
Basic Usage:
ps
By default, running ps without any options displays a list of processes associated with the current terminal session. This may include both user and system processes.
Common Options:
-eor--everyone: Show information about all processes. This is useful for viewing processes from all users.ps -e-f: Display a full-format listing, providing more detailed information about processes.ps -f-u <username>: Show processes for a specific user. Replace<username>with the actual username.ps -u john-aux: A combination of options that displays a detailed list of all processes, including user, CPU usage, memory usage, and more.ps -aux-p <PID>: Show information about a specific process identified by its PID. Replace<PID>with the process ID.ps -p 12345-C <command>: Display processes that match a specific command name.ps -C apache2-eF: Show the entire process tree as a forest. This displays the hierarchical relationship between parent and child processes.ps -eF
Output Columns:
The output of the ps command typically includes various columns providing information about each process. Common columns include:
PID: Process ID.PPID: Parent Process ID (the ID of the parent process that started this process).USER: The username of the process owner.%CPU: CPU usage as a percentage.%MEM: Memory usage as a percentage.VSZ: Virtual memory size (in kilobytes).RSS: Resident Set Size (in kilobytes).TTY: Terminal type associated with the process.STAT: Process status (e.g., running, sleeping, zombie).START: Start time of the process.COMMAND: The command or program being executed.
🔹Linux Kill Command
The kill command in Linux is used to send a signal to a running process, which can be used to control or terminate that process. It's a powerful tool for managing processes on a Linux system. Here's how to use the kill command:
Basic Usage:
The basic syntax of the kill command is as follows:
kill [signal] [PID]
signal: This is the signal that you want to send to the process. If you don't specify a signal, the default signal is SIGTERM (terminate gracefully). Common signals include:SIGTERM (15): Gracefully terminate the process.
SIGKILL (9): Forcefully terminate the process.
SIGHUP (1): Hang up. Often used to restart daemons.
SIGINT (2): Interrupt. Sent when you press Ctrl+C in the terminal.
PID: This is the Process ID of the target process that you want to send the signal to.
Killing a Process:
To terminate a process gracefully (allowing it to clean up resources), you can use the kill command with the default SIGTERM signal. For example:
kill PID
Replace PID with the actual Process ID of the process you want to terminate.
Forcefully Killing a Process:
If a process is unresponsive or you need to forcefully terminate it, you can use the SIGKILL signal (signal 9). For example:
kill -9 PID
Again, replace PID with the actual Process ID.
Finding Process IDs:
To find the Process ID (PID) of a process, you can use commands like ps or pgrep. For example:
ps aux | grep process_name
This will list processes containing "process_name," and you can identify the PID from the output.
🔹Top Command
The top command in Linux is a powerful utility that provides a real-time, dynamic view of the processes running on your system. It displays system statistics and a list of currently running processes. It's a valuable tool for monitoring system performance and identifying resource-intensive processes. Here's an explanation of how to use the top command with examples:
Basic Usage:
To launch the top command, open a terminal and simply type:
top
When you run top, you'll see a continuously updating screen with information about your system's performance and a list of processes.
top then c: shows commands absolute path.
top then k: kill the process by PID.
top then n: change the no of tasks displayed.
top then d,s: to change the interval of refresh.
top then m: to sort the Linux running process by memory usage.
top then r: you can change the nice value of the PID.
top the u: to filter tasks by the user.
top then f: field management.
top then h: help.
top then z or b: toggle: 'z' color/mono; 'b' bold/reverse.
top then x, y: 'x' sort field; 'y' running tasks.
top then i: process which some memory usage.
Quitting top:
To exit the top command, press the q key.
🔹Linux with nohup, nice, bg, fg, and jobs Commands
Managing processes on Linux involves various commands and techniques to control how processes run and interact with your system. Here are explanations and examples of commonly used commands: nohup, nice, bg, fg, and jobs.
nohup (No Hang Up):
The
nohupcommand is used to run a process in the background, and it ensures that the process continues to run even if you log out or close the terminal.Example:
nohup command-to-run &command-to-runis the process you want to start.&runs the process in the background.
Usage: Useful for running long-running tasks, such as backups or data transfers, that you want to continue even if your terminal session ends.
nice:
The
nicecommand is used to set the priority of a process, which determines how much CPU time it gets. A lower value means higher priority.Example:
nice -n 10 command-to-runcommand-to-runis the process you want to start.-n 10sets the process's priority to a lower value.
Usage: Useful for controlling CPU resource allocation among multiple processes.
bg (Background) and fg (Foreground):
bgandfgcommands are used to manage processes that are currently running in the background or foreground.bgsends a background process to the background, whilefgbrings a background process to the foreground.Example:
To background a process:
bg %1%1refers to the job number of the backgrounded process.
To foreground a process:
fg %1%1refers to the job number of the foregrounded process.
Usage: Useful when you want to switch between running processes in the same terminal session.
jobs:
The
jobscommand lists all background jobs and their statuses in the current terminal session.Example:
jobsUsage: Useful for checking the status of background processes and their job numbers.