


Table of contents
- 🔹Linux SU and SUDO Commands
- 🔹Linux df, du and free Commands
- 🔹How to Use Linux DMESG Command for System Monitor
- 🔹Chmod Command in Linux
- 🔹Linux Access Control List (ACL)
- 🔹What is SUID and SGID in Linux?
- 🔹Linux Sticky Bit
- 🔹Linux Chown, Chgrp Command
- 🔹Cron And Crontab in linux
- 🔹Linux at command
- 🔹Linux SSH Basics
- 🔹How to SSH Login Without a Password on a Linux Server
- 🔹FTP in Linux
- 🔹 Linux Ping Command to Troubleshoot Network Issues
- 🔹How to Use Linux Netstat Command to Troubleshoot Network Issues
- 🔹Linux AWK and CUT commands
- 🔹Linux SED Command
- 🔹how to change hostname in Linux
🔹Linux SU and SUDO Commands
In Linux, the su and sudo commands are used to switch users or execute commands with elevated privileges. Here's an explanation of both commands:
su (Switch User):
The
sucommand allows you to switch to another user account in a terminal session. By default, it switches to the superuser (root) account, but you can specify a different user if needed.To switch to the root user, open a terminal and simply type:
bashCopy codesuYou will be prompted to enter the root user's password. Once authenticated, you will have root-level access. To switch to a different user, use:
bashCopy codesu usernameReplace
usernamewith the name of the user account you want to switch to. You will be prompted to enter the target user's password.sudo (Superuser Do):
The
sudocommand allows authorized users to execute specific commands as the superuser (root) or another user, as configured in the sudoers file. It provides a more fine-grained approach to granting elevated privileges.To run a single command with superuser privileges using
sudo, use the following syntax:sudo commandFor example, to update the package list and upgrade packages, you can use:
 sudo apt update
 sudo apt upgrade
You will be prompted to enter your own password, not the root password, to confirm your identity. If you have the necessary permissions in the sudoers file, the command will execute with superuser privileges.
To give a user sudo access, you need to add their username to the sudoers file. This is typically done by the system administrator. To edit the sudoers file, use the
visudocommand, which opens the file in a safe manner:sudo visudoThis command opens the sudoers file in a safe text editor, typically
nanoorvim, depending on your system configuration.Add a user with permission to run all commands:
To allow a user to run all commands with superuser privileges, add the following line to the sudoers file, replacing
usernamewith the actual username:username ALL=(ALL:ALL) ALLHere's what each part of the line means:
username: Replace this with the actual username.ALL: Allows the user to run commands from any terminal.=(ALL:ALL): Specifies the user can run commands as any user and any group.ALL: Permits the user to run any command.
Add a user with permission to run specific commands:
To allow a user to run specific commands with superuser privileges, add lines similar to the following to the sudoers file:
username ALL=(ALL:ALL) /path/to/command1, /path/to/command2Replace
usernamewith the actual username,/path/to/command1with the actual path to the first command, and/path/to/command2with the actual path to the second command. You can list as many commands as needed, separated by commas.Save and exit the text editor:
If you're using
nano, pressCtrl+Oto save, thenEnter, and finallyCtrl+Xto exit.If you're using
vim, pressEsc, then type:wqand pressEnter.
Now, the specified user will have the appropriate permissions to run all commands or specific commands as specified in the sudoers file. Make sure to replace username and /path/to/command with actual values in your configuration.
🔹Linux df, du and free Commands
Here's an explanation of some common parameters and options for the df, du, and free commands:
df (Disk Free):
-h: Human-readable format. Displays sizes in a more readable format (e.g., GB, MB).Example:
df -h-B <block-size>: Sets the block size for display. You can specify block size units such as K, M, G, T, P, or E.Example:
df -B M
du (Disk Usage):
-h: Human-readable format. Makes the sizes human-readable (e.g., MB, GB).Example:
du -h-s: Provides a summary of the specified directory's disk usage.Example:
du -sh /path/to/directory-c: Displays a total at the end of the output, showing the sum of sizes for all files and directories.Example:
du -hc /path/to/directory/*
free:
-h: Human-readable format. Displays memory sizes in a more readable format (e.g., MB, GB).Example:
free -h-b: Displays memory sizes in bytes.Example:
free -b
These parameters and options allow you to customize the output of the commands to suit your preferences and requirements, making it easier to interpret the information provided by df, du, and free.
🔹How to Use Linux DMESG Command for System Monitor
The dmesg command in Linux is used to display and examine the messages from the kernel's ring buffer. These messages can provide valuable information about system events, hardware detection, and error messages. Here's how to use the dmesg command for system monitoring:
View Kernel Messages:
To view the kernel messages generated during the current session, simply run:
dmesgThis command will display a list of kernel messages, starting with the most recent events. You can scroll through the messages to see if there are any relevant system events or errors.
dmesg -H (Human-Readable Output):
The
-Hoption provides human-readable output, converting numeric error codes to more descriptive messages.dmesg -H
Filter Messages:
To filter messages by a specific keyword or string, you can use the
grepcommand in combination withdmesg. For example, to find messages related to disk (sda) events:dmesg | grep sda
Show Only Errors:
If you're interested in viewing only error messages, you can filter for messages containing the word "error":
dmesg | grep -i errorThe
-ioption makes the search case-insensitive, so it will catch both "error" and "ERROR" messages.
Continuous Monitoring:
To continuously monitor kernel messages as they are generated in real-time, you can use the
-w(follow) option:dmesg -wThis can be useful for monitoring hardware events or debugging issues.
Save to a File:
You can save the output of
dmesgto a file for later analysis:dmesg > dmesg_log.txtThis will redirect the output to a file named "dmesg_log.txt" in the current directory.
dmesg -T (Human-Readable Timestamps):
This option displays kernel messages with human-readable timestamps, making it easier to understand when events occurred.
dmesg -T
dmesg -l (Log Levels):
The
-loption allows you to filter messages by log levels. You can specify the log level(s) you want to view. For example, to view messages of level "warning" and above:dmesg -l warningCommon log levels include "emerg," "alert," "crit," "err" (error), "warning," "notice," "info," and "debug." You can specify multiple log levels separated by commas.
dmesg -c (Clear Buffer):
This option clears the kernel ring buffer after displaying its contents. It's useful if you want to start with a clean buffer for monitoring new messages.
dmesg -c
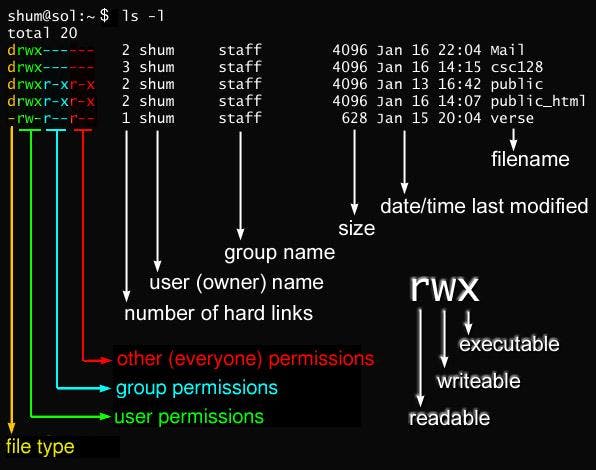
🔹Chmod Command in Linux
The chmod command in Linux is used to change the permissions (read, write, execute) of files and directories. It allows you to control who can access and modify a file or directory.
r(read): Allows reading or viewing the file.w(write): Allows modifying or editing the file.x(execute): Allows executing or running the file if it is a script or program.
Here's how the permissions are represented and what they mean:
rwx: Indicates full permissions (read, write, and execute).-: Indicates that a specific permission is not granted.
The numbers 0-7 are used to represent different permission combinations. Each permission type has an associated number value:
r(read) = 4w(write) = 2x(execute) = 1
To set permissions, you can assign the appropriate number value to each permission type and sum them up. Here are some examples:
777means full permissions for all users (read, write, and execute).755means the owner has full permissions, while the group and others have read and execute permissions.644means the owner has read and write permissions, while the group and others have only read permissions.
To apply permissions using the chmod command, you need to specify the permission set followed by the file or directory you want to modify. Here are a few examples:
Grant full permissions (read, write, and execute) to all users:
chmod permissions filename
chmod 777 myfile.txt
#To give full permissions (read, write, and execute) to all users
chmod a=rwx filename
#set permissions individually for the owner,group, and others
chmod u=rwx,g=rwx,o=rwx filename
chmod u+rwx,g+rwx,o+rwx filename
#removing permissions
chmod u-rwx,g-wx,o-wx filename

🔹Linux Access Control List (ACL)
Linux Access Control Lists (ACLs) provide a way to set fine-grained permissions on files and directories beyond the traditional owner-group-other (ugo) permissions. ACLs allow you to specify permissions for specific users or groups, giving you more control over who can access and modify files. Here's an explanation of Linux ACLs with an example:
Basic ACL Terminology:
user(u): Refers to a specific user.group(g): Refers to a specific group.other(o): Refers to all other users.mask: Represents the maximum permissions that can be granted via ACL entries.default: Specifies the default ACL for newly created files or directories within a directory.
Setting Up ACLs:
Check ACL Support: Before using ACLs, make sure your filesystem supports them. Most modern Linux filesystems, such as ext4, support ACLs by default.
Viewing ACLs: You can view the ACLs of a file or directory using the
getfaclcommand. For example:getfacl filename
Example of Using ACLs: Let's say you have a directory called /data and you want to grant read and write permissions to a specific user named alice and a specific group named project. Here's how you can do it with ACLs:
Granting ACL Permissions:
Give read and write permissions to
alice:setfacl -m u:alice:rw /dataGive read and write permissions to the
projectgroup:setfacl -m g:project:rw /data
Viewing ACLs: You can view the ACLs of the
/datadirectory usinggetfacl:getfacl /dataResulting ACLs: After applying the ACLs, you will see something like this when you run
getfacl /data:makefileCopy code# file: /data # owner: user1 # group: group1 user::rwx user:alice:rw- group::r-x group:project:rw- mask::rw- other::r--
Now, alice and the project group have read and write permissions on the /data directory in addition to the owner (user1) and group (group1) permissions.
🔹What is SUID and SGID in Linux?
SUID (Set User ID) and SGID (Set Group ID) are special permissions in Linux that allow a program to run with the permissions of the user who owns the file (SUID) or the group that owns the file (SGID), rather than the permissions of the user who is running the program.
1. SUID (Set User ID):
When a program has the SUID permission set, it runs with the permissions of the file's owner.
Typically, SUID is used for programs that need access to resources or perform actions that require elevated privileges but should be executed by regular users.
An example is the
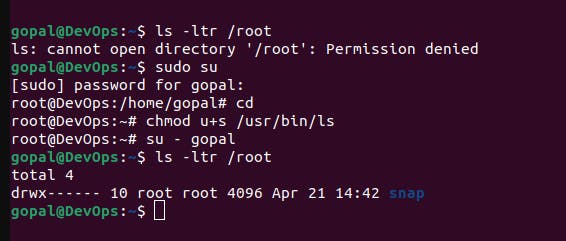
passwdcommand. This command needs to modify the/etc/shadowfile, which regular users cannot normally access. However, it is essential for users to be able to change their passwords. Therefore, thepasswdcommand has the SUID permission set so that it runs with the permissions of the file's owner (usually root) and can modify the necessary system files.Suppose you have a file in the
/rootdirectory, and you want to give a regular user permission to execute it without changing their user identity.First, check the current permissions of the file:
ls -l /rootTo add the SUID permission, use the
chmodcommand with theu+soption:chmod u+s /usr/bin/lsAfter setting the SUID bit, the permissions should look like this:
-rwsr-xr-x 1 root root 12345 Sep 16 10:00 /usr/bin/lsNow, when a regular user executes
/root/myfile, it will run with the permissions of the file's owner (root).
2. SGID (Set Group ID):
When a program has the SGID permission set, it runs with the permissions of the file's group owner.
SGID is often used for scenarios where multiple users need to work collaboratively on files within a shared directory and need a common group ownership for those files.
An example is a shared directory used by a project team. If all team members belong to the same group, setting the SGID permission on the directory ensures that any files created within that directory inherit the group ownership of the directory. This allows all team members to access and edit each other's files, simplifying collaboration.
Let's assume you have created a user named
rohanand a group namedQA:sudo groupadd QA sudo useradd -m -G QA -g QA rohan sudo passwd rohan su - rohanCreate a directory
/tmp/qa_folderand set its permissions to777:mkdir /tmp/qa_folder chmod 777 /tmp/qa_folderRemove the
setgidpermission from the directory using theg-soption:chmod g+s /tmp/qa_folderNow, as the user
mighty(or any other user), create a file inside/tmp/qa_folder:su - mighty touch /tmp/qa_folder/myfile.txtIf you list the contents of
/tmp/qa_folderas the usermighty, you should see that the group of the directory and the file is set toQA:su - rohan ls -ltr /tmp/qa_folderThe output might look like:
-rw-r--r-- 1 mighty QA 0 Sep 16 11:00 myfile.txt
🔹Linux Sticky Bit
The Linux Sticky Bit is a permission that can be set on directories to control who can delete or modify files within that directory. When the Sticky Bit is set on a directory, only the owner of a file within that directory, the directory's owner, and the superuser (root) can delete or rename the files. Other users, even if they have write permissions on the directory, cannot delete or modify files within it unless they are the owner of the file.
The Sticky Bit is represented as a "t" at the end of the directory's permission bits. You can use the chmod command to set the Sticky Bit. For example:
chmod o+t directoryname
Here's an example of how the Sticky Bit works:
Suppose you have a directory called
/tmp/mydirwith the Sticky Bit set.Users "alice" and "bob" both have write permissions on
/tmp/mydir."alice" creates a file called
file1.txtinside/tmp/mydir.Now, even though "bob" has write permissions on
/tmp/mydir, he cannot delete or renamefile1.txtbecause he is not the owner of the file.However, "alice" can delete or modify
file1.txtbecause she is the owner of the file.
The Sticky Bit is often used on directories where multiple users have write access, such as the /tmp directory, to prevent accidental deletion of each other's files. It ensures that only the owner of a file or the administrator (root) has the authority to remove or modify files within that directory.
🔹Linux Chown, Chgrp Command
The chown and chgrp commands in Linux are used to change the ownership and group ownership of files and directories. Here are explanations and examples for both commands:
1. chown Command:
chownstands for "change owner" and is used to change the owner of a file or directory.The basic syntax of the
chowncommand is:chown [OPTIONS] OWNER[:GROUP] FILE/DIRECTORYOWNERis the new owner's username, andGROUPis the new group's name (optional).
Example 1: Change the owner of a file:
chown -c newuser myfile.txt
This command changes the owner of myfile.txt to the user newuser.
Example 2: Change the owner and group of a directory and its contents recursively:
chown -R newuser:newgroup mydirectory
This command changes both the owner and group of the directory mydirectory and its contents to newuser and newgroup, respectively, recursively.
2. chgrp Command:
chgrpstands for "change group" and is used to change the group ownership of files and directories.The basic syntax of the
chgrpcommand is:chgrp [OPTIONS] GROUP FILE/DIRECTORYGROUPis the name of the new group for the file or directory.
Example: Change the group of a file:
chgrp newgroup myfile.txt
This command changes the group ownership of myfile.txt to the group newgroup.
Both chown and chgrp commands are useful for managing file and directory ownership and permissions in Linux. They are often used to grant or restrict access to files and directories for different users and groups.


🔹Cron And Crontab in linux
Cron:
Daemon responsible for executing scheduled tasks.
Runs in the background continuously.
Executes commands or scripts based on the schedule defined in crontab files.
Managed by the system administrator.
Crontab:
File containing a user's scheduled commands or scripts.
Edited using the
crontabcommand.Defines the schedule and commands for individual cron jobs.
Managed by the individual user.
Understanding the difference between cron and crontab helps in effectively scheduling and managing tasks on Unix-like systems, allowing for automated execution of commands or scripts at specific times or intervals.
Here's an example to help you understand how to set up a cron job using the crontab command for the first time:
Open a terminal or shell session.
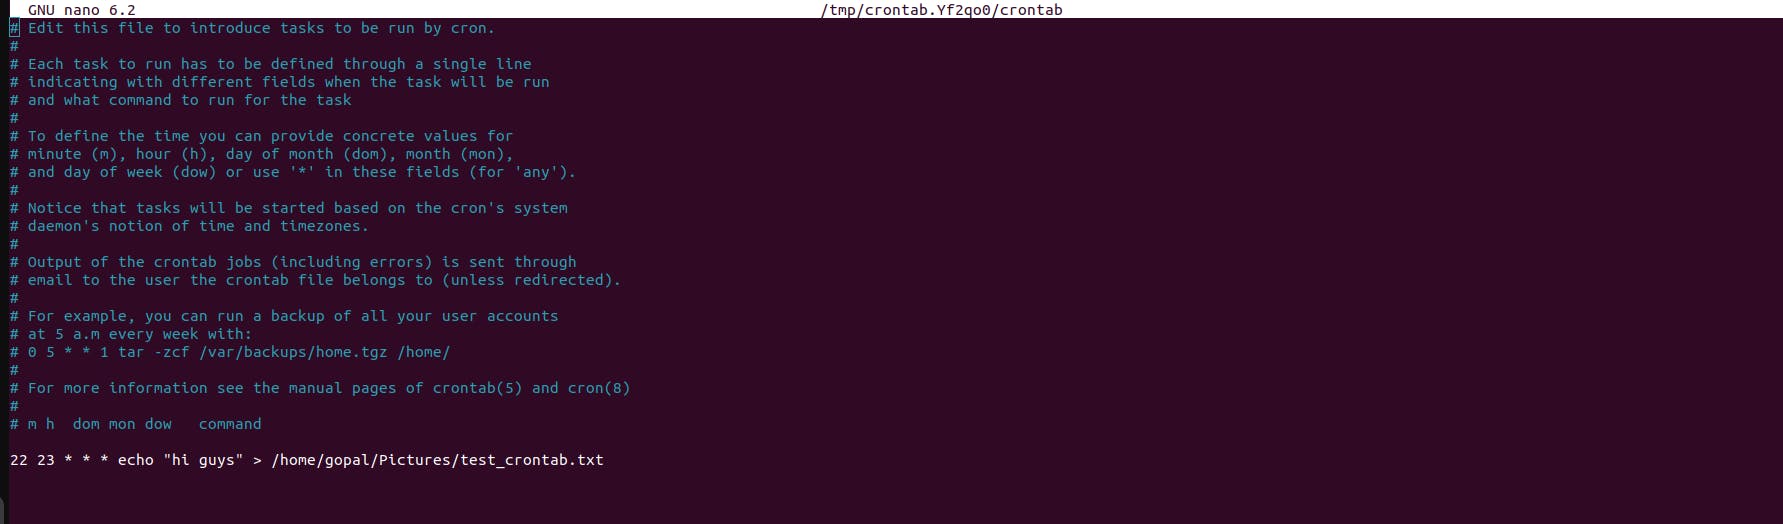
Type the following command to open the crontab file for editing:
crontab -eIf it's your first time setting up a cron job, you may be prompted to choose an editor. Select your preferred editor (e.g., nano, vim, or emacs).
Once the editor opens, you can add your cron job entry. Each line in the crontab file represents a separate cron job. The structure of a cron job line is as follows:
* * * * * command
The five * represent the minute, hour, day of the month, month, and day of the week, respectively. Each field can accept specific values or wildcard characters to indicate all possible values. The command represents the command or script you want to schedule.
In this case, we will set the minute field to 22 and the hour field to 23 to represent 11:22 PM.
22 23 * * * echo "hi guys" > /home/gopal/Pictures/test_crontab.txt

🔹Linux at command
The "at" command in Linux is used to schedule one-time tasks to run at a specific time in the future. Here's a brief explanation with an example:
Scheduling a Task: To schedule a task using the "at" command, use the following syntax:
at <time>For example, to schedule a task to run at 2:30 PM, you would enter:
at 2:30 PMExecuting Commands: After you enter the "at" command, you'll be prompted to enter the commands you want to execute. You can enter one or more commands, and each command should be terminated with the Ctrl+D key combination.
For example, to schedule a simple task to display a message, you can do the following:
 at 2:30 PM
 at> echo "Hello, world!"
 at> Ctrl+D
Viewing Scheduled Tasks: You can list the scheduled tasks using the "atq" command:
atqRemoving Scheduled Tasks: To remove a scheduled task, use the "atrm" command followed by the job number:
atrm <job_number>For example:
atrm 1Example Scenario: Let's say you want to schedule a backup script to run at 3:00 AM:
 at 3:00 AM
 at> /path/to/backup-script.sh
 at> Ctrl+D
This will execute your backup script at the specified time.
🔹Linux SSH Basics
SSH Command: To initiate an SSH connection, use the
sshcommand followed by the username and the IP address or domain name of the remote server:ssh username@server_ip_or_domainAuthentication: After entering the command, you'll be prompted to enter the user's password. If it's your first time connecting to the server, you might also receive a message to confirm the server's authenticity. Type "yes" to continue.
SSH Key Authentication (Optional): Instead of using a password, you can set up SSH key-based authentication for added security. This method involves creating an SSH key pair (public and private keys) and copying the public key to the server.
Successful Connection: If the authentication is successful, you'll gain access to the remote server's command line interface. You can now execute commands on the remote server as if you were physically present.
Logging Out: To log out of the SSH session, simply type:
exit
SSH provides a secure and encrypted method for connecting to remote servers over a network. It's widely used for server administration, file transfer, and tunneling network connections securely.
🔹How to SSH Login Without a Password on a Linux Server
To SSH login without a password on a Linux server, you can set up SSH key-based authentication. This method is more secure and convenient than using passwords. Here's how to do it:
Generate SSH Key Pair on Your Local Machine:
Open a terminal on your local machine.
Use the following command to generate an SSH key pair (public and private keys):
ssh-keygen -t rsaYou can press Enter to accept the default file location and passphrase (leave it empty for no passphrase).
Copy Your Public Key to the Remote Server:
Use the
ssh-copy-idcommand to copy your public key to the remote server. Replaceusernamewith your server's username andserver_ip_or_domainwith the server's IP address or domain name:ssh-copy-id username@server_ip_or_domain
Passwordless SSH Login:
After copying the key, you can now SSH into the server without a password. Simply use the
sshcommand:ssh username@server_ip_or_domainIf you set up a passphrase during key generation, you'll need to enter it once, but you won't need your server password.
Now, you can securely log in to your Linux server without using a password. SSH key-based authentication is more secure because it's resistant to brute force attacks and doesn't expose your password to potential threats.
🔹FTP in Linux
FTP (File Transfer Protocol) in Linux is a network protocol used for transferring files between a local and a remote computer.Here's a brief explanation along with an example:
On the Remote Server (Setting up VSFTPD):
Install VSFTPD: Use your package manager to install VSFTPD on the remote server. For example, on Ubuntu, you can run:
sudo apt-get install vsftpdConfigure VSFTPD: Edit the VSFTPD configuration file, typically located at
/etc/vsftpd.conf or /etc/vsftpd/vsftpd.conf, and make the following changes or ensure they are correctly set:Enable/Disable anonymous access (if needed) by setting
anonymous_enable=NOUncomment
write_enable=YESdownload_enable=YESmay add
use_localtime=YES
Restart VSFTPD: Restart the VSFTPD service to apply the configuration changes:
sudo service vsftpd restart
On the Client (Connecting to the VSFTPD Server):
Install an FTP Client: You can use an FTP client of your choice. For example, to install the
ftpclient on Linux, run:sudo apt-get install ftpConnect to the FTP Server: Use the
ftpcommand to connect to the remote FTP server. Replace<remote-server-ip>with the IP address or hostname of the remote server:ftp <remote-server-ip>Log In: Enter your FTP username and password when prompted. If configured, you can also log in anonymously.
Transfer Files: Once logged in, you can use FTP commands like
put(upload) andget(download) to transfer files between the client and the remote server. For example:put local-file.txt # Upload a file to the server get remote-file.txt # Download a file from the serverDisconnect: To quit the FTP session, simply type
quitorbye.
🔹 Linux Ping Command to Troubleshoot Network Issues
The ping command in Linux is a valuable tool for troubleshooting network connectivity issues. Here's a brief explanation of how to use it:
Open a Terminal: First, open a terminal window on your Linux system. You can usually find the terminal application in your system's applications or by searching for "Terminal."
Syntax of the Ping Command: The basic syntax of the
pingcommand is as follows:ping [options] <hostname or IP address>Ping a Host or IP Address: Replace
<hostname or IP address>with the hostname or IP address of the remote server or device you want to ping. For example:ping google.comAnalyze the Results: The
pingcommand sends a series of ICMP (Internet Control Message Protocol) packets to the target host and waits for replies. Here's what you can learn from the output:Round-trip time (RTT): The time it takes for a packet to travel from your computer to the target host and back. Lower values are better.
Packet loss: If you see "packet loss," it means some of the packets sent were not received. This can indicate network issues.
Stop Ping: To stop the
pingcommand, pressCtrl + C.Common Ping Options:
-c count: Specifies the number of packets to send before stopping.-i interval: Sets the time interval (in seconds) between sending each packet.-s packetsize: Defines the size of the packets to send.-t timeout: Sets the maximum amount of time to wait for a response.-q: Quiet mode; it only displays the summary at the end.
Example:
ping -c 4 -i 1 google.com
In this example, we're sending four packets with a one-second interval to google.com.
The ping command can help diagnose network issues by checking if a host is reachable and measuring the quality of the connection. It's often used to identify problems like high latency, packet loss, or unreachable hosts.
🔹How to Use Linux Netstat Command to Troubleshoot Network Issues
The netstat command in Linux is a powerful tool for troubleshooting network issues. It provides information about network connections, routing tables, interface statistics, masquerade connections, and much more. Here's how to use it to diagnose network problems:
1. Check Active Network Connections:
To view a list of all active network connections, use:
netstat -tulnThis command will show you TCP (
-t) and UDP (-u) connections along with the listening (-l) ports and numerical addresses (-n).
2. Display All Network Interfaces:
To list all network interfaces on your system, including their IP addresses and MAC addresses, run:
netstat -ie
3. Show Routing Table:
To display the kernel routing table, use:
netstat -rThis shows the destination, gateway, and other routing details.
4. Monitor Network Statistics:
You can monitor network statistics in real-time by using the
-coption:netstat -i -cThis command will continuously display interface statistics like packets in/out and errors.
5. Investigate Specific Port or Address:
To check if a specific port is in use, replace
PORT_NUMBERwith the port you want to investigate:netstat -tuln | grep PORT_NUMBERTo find which process is using a port, add the
-poption:netstat -tulnp | grep PORT_NUMBER
6. Display Masqueraded Connections:
To see masqueraded (NAT) connections, use:
netstat -m
7. Check for Network Services:
To list network services running on your system, use the following command:
netstat -tuln
8. List Sockets in Listening State:
To see sockets in the listening state, which can be useful for identifying open services, run:
netstat -tln
9. View Network Groups (Multicast):
To display multicast group memberships, use:
netstat -g
10. Filter Output: - You can pipe netstat output through tools like grep, awk, or sed to filter and format the results as needed.
🔹Linux AWK and CUT commands
AWK Command:
AWK is a versatile text processing tool in Linux used for searching, processing, and manipulating text data. It is particularly useful for processing structured text files, like CSV or log files, and extracting specific information from them. Here's an explanation of AWK:
Basic Syntax: The basic structure of an AWK command is:
awk 'pattern { action }' input_filepatternspecifies a condition or regular expression to match lines in the input file.actiondefines the operation to perform on lines that match the pattern.input_fileis the file or input stream to process.
Example: Let's say you have a CSV file, and you want to print the second column of each row. You can use AWK like this:
awk -F ',' '{print $2}' data.csv-F ','sets the field separator to a comma (,).'{print $2}'specifies the action to print the second field.
Common Use Cases:
Summing columns or calculating averages.
Text data extraction and transformation.
Report generation.
Conditional processing based on patterns.
Complex data manipulations.
CUT Command:
The cut command in Linux is used for extracting specific columns or sections of lines from files. It's particularly handy for text processing tasks where data is structured in columns. Here's an explanation of the cut command:
Basic Syntax: The basic structure of a
cutcommand is:cut [options] [file(s)]Options:
-c, --characters: Specify the character positions to cut.-d, --delimiter: Set the delimiter (default is TAB).-f, --fields: Specify fields to extract based on a delimiter.-s, --only-delimited: Suppress lines with no delimiter characters.-n, --output-delimiter: Specify the output delimiter.-b, --bytes: Specify byte positions to cut (useful for binary files).
Examples:
Extract the first three characters from each line of a file:
cut -c 1-3 file.txtExtract the second field from a CSV file using a comma as the delimiter:
cut -d ',' -f 2 data.csv
Common Use Cases:
Parsing structured text files.
Selecting specific columns from CSV files.
Truncating or filtering text data.
Preparing data for further processing with other commands or scripts.
🔹Linux SED Command
The sed command, short for "stream editor," is a powerful tool in Linux used for text processing and manipulation. It allows you to perform various operations on text data, such as searching, replacing, inserting, and deleting text.
Here's a basic explanation of the sed command with examples:
Search and Replace: To search for a specific pattern in a file and replace it with another, use the following syntax:
sed 's/search_pattern/replace_pattern/' filenameExample:
sed 's/apples/oranges/' fruits.txtReplace All Occurrences Globally: To replace all occurrences of a pattern in a file, add the
gflag at the end:sed 's/search_pattern/replace_pattern/g' filenameExample:
sed 's/apples/oranges/g' fruits.txtIn-Place Editing: To modify a file in place (without creating a new one), use the
-iflag:sed -i 's/search_pattern/replace_pattern/' filenameExample:
sed -i 's/apples/oranges/' fruits.txtDelete Lines: To delete lines that match a pattern, use
d:sed '/pattern_to_delete/d' filenameExample:
sed '/apple/d' fruits.txtInsert and Append Text: To insert text before a specific line number, use
i, and to append text after a line, usea:sed '3i\Inserted Text' filename sed '4a\Appended Text' filenameExample:
 sed '3i\This is a new line' fruits.txt
 sed '4a\New line after this' fruits.txt
Substitute Using Regular Expressions:
sedsupports regular expressions for more complex pattern matching and substitution.Example (using regular expression):
sed 's/[0-9][0-9]$/XX/' numbers.txt
These are just a few examples of what you can do with the sed command. It's a versatile tool for text manipulation in Linux.
🔹how to change hostname in Linux
To change the hostname in Linux, you can follow these steps:
Method 1: Using the hostnamectl command (Recommended)
Open a terminal or log in to your Linux system.
To view the current hostname, run the following command:
hostnamectlTo change the hostname, use the following command, replacing "new-hostname" with your desired hostname:
sudo hostnamectl set-hostname new-hostnameVerify that the hostname has been changed by running
hostnamectlagain:hostnamectlReboot your system for the changes to take effect:
sudo reboot
Method 2: Editing the /etc/hostname file
Open a terminal or log in to your Linux system.
Use a text editor (e.g., nano, vi) to edit the
/etc/hostnamefile:sudo nano /etc/hostnameReplace the current hostname in the file with your desired hostname.
Save the changes and exit the text editor.
You also need to edit the
/etc/hostsfile to associate the new hostname with the loopback address. Open the file:sudo nano /etc/hostsFind the line that starts with
127.0.0.1and contains the old hostname. Replace the old hostname with the new one.Save the changes and exit the text editor.
Reboot your system for the changes to take effect:
sudo reboot
Method 3: Temporary Change
If you want to change the hostname temporarily without rebooting, you can use the hostname command. However, this change will not persist after a reboot:
Open a terminal.
To change the hostname temporarily, run:
sudo hostname new-hostnameTo verify the change, run
hostnamewithout any arguments:hostname
Keep in mind that the methods involving hostnamectl and editing system files are more persistent and will survive reboots, while the hostname command provides only temporary changes. Use the method that best suits your needs.